Hello everyone!
It is time to make some changes!!
And with that comes a new website. And my own domain!!
All of the recipes here are not moving anywhere. Don't worry. But if you want to check out what is happening with all the pixies in my life and the new cakes I am making, please head on over to The Baking Pixie.
Can't wait to see you there!

Saturday, March 12, 2016
Thursday, January 14, 2016
Welcome to 2016!
33 chocolate bourbon pecan pies, 140 mini cupcakes, 15 dozen cookies, and 4 fondant cakes. That was my month of December and the first part of January. Oh, and keeping up with these two.


The smallest pixie turns two this Friday and I need to start filling out paperwork to register my other pixie for kindergarten this year. I can't believe how time flies when you are running around screaming "Don't sit on your brother!".
The first cake I did was based off the phone app Geometry Dash. My neighbors loved it and so did everyone else in Red Lobster apparently.

I also made another game themed cake and this one was based off of Team Fortress 2. My neighbor had absolutely no idea about the game that her son loves so I was able to play around with this one a little bit.

I even made a cake topper in the form of the beloved "Sandvich" that one of the characters eats to replenish his health.

The last cake that I just completed was for a very special person in my life. My grandmother turned 80 this past week and the family threw her a surprise birthday party. When I called her on her birthday, and asked how she was doing, the first thing she said was she was sore from doing 2 hours of water aerobics that morning. Yes, my 80 year old grandmother could kick my butt in the gym.
My grandmother is an amazing woman. She has bungee jumped with me and my brother. She has jumped out of an airplane and gone white water rafting. She has traveled the world and yet knows everyone in our small hometown. She has taught swimming lessons for as long as I can remember. She has taught so long that she is teaching people's grandchildren now. I have watched her open her heart and home to people in AA. She has been sober for 35 years now and has seen people at their lowest. And it doesn't turn her away from helping someone in need.
She volunteers with the Red Cross teaching CPR and life guarding courses. She volunteers with the Special Olympics. She has won medals of all kinds swimming in the senior Olympics. And she was just inducted in to the Boys and Girls Club Hall of Fame.
Now that, ladies and gentlemen, is who you strive to be when you get older.
Happy 80th Birthday Maga!

Tuesday, April 21, 2015
Dark chocolate banana muffins

I found this recipe from Erica's Sweet Tooth here. The recipe originally called for the bananas to be transformed into bread but I always like making muffins. It's a little easier for my husband's coworkers to pick it up and go. Please go to her website for the recipe!
I didn't have to do anything special to change from bread to muffins. And the only thing I added to the original recipe is cinnamon chips. If you have read my blog at all, you will know how big a fan I am of cinnamon chips. Cinnamon just goes with bananas. At least in this crazy house, it does.
Have a great week bakers!
Tuesday, April 14, 2015
Another busy summer ahead
Thanks to friends and family, I have been super busy with cakes lately. I have had at least a cake a week, if not two. And word keeps spreading. Not that I am complaining. I love meeting new people and talking cake!
I got to make another grooms cake for a family friend a few weeks ago. Navy luster dust was used to paint the Patriots football logo onto the cake. I finished off the edge by cutting out names of players (and coach) that the groom loved. The Patriots are a big thing in this house. Not for me....but for my husband and his family it is. Being from the Boston area, I am pretty sure it is in their DNA to love this team. I, on the otherhand, will choose to scrub floor boards over watching the Patriots. Unless Julian Edelman is talking...then I might sneak a peak at the television now and then.

The second cake for that weekend was for my awesome little neighbor who turned 10. Think pixie fairy combined with Hermione Granger when it comes to this one. She is smart, tough as nails, and beautiful to watch as she is growing up. She is also quite the little artist.

I was able to recreate some of her artwork and frame it on the cake. I was able to see pictures from her birthday party and seeing the picture when she sees her cake for the first time was pretty awesome.
I was also able to squeeze in our traditional Easter cake. Ever since we moved to North Carolina, I have been making cakes for our family dinner. This cake was made in between egg hunts, trolley pub tours, and fun with the family. Out of all the cakes I have made this year, this is one of my favorites.

The last cake I am going to show you was for another neighbor who turned 12. She wanted an "Alice in Wonderland" cake and was very specific about her ideas. She even came prepared with pictures and colors for me when it came time to discuss the specifics. It was my most ambitious cake to date and I am not looking forward to doing that much detail work again anytime soon.

Next up, I get to make a first communion cake and a Nike sneaker grooms cake! And I made some absolutely delicious dark chocolate banana muffins that I will hopefully get to post about soon. I hope everyone is having a great big busy Spring!
I got to make another grooms cake for a family friend a few weeks ago. Navy luster dust was used to paint the Patriots football logo onto the cake. I finished off the edge by cutting out names of players (and coach) that the groom loved. The Patriots are a big thing in this house. Not for me....but for my husband and his family it is. Being from the Boston area, I am pretty sure it is in their DNA to love this team. I, on the otherhand, will choose to scrub floor boards over watching the Patriots. Unless Julian Edelman is talking...then I might sneak a peak at the television now and then.
The second cake for that weekend was for my awesome little neighbor who turned 10. Think pixie fairy combined with Hermione Granger when it comes to this one. She is smart, tough as nails, and beautiful to watch as she is growing up. She is also quite the little artist.
I was able to recreate some of her artwork and frame it on the cake. I was able to see pictures from her birthday party and seeing the picture when she sees her cake for the first time was pretty awesome.
I was also able to squeeze in our traditional Easter cake. Ever since we moved to North Carolina, I have been making cakes for our family dinner. This cake was made in between egg hunts, trolley pub tours, and fun with the family. Out of all the cakes I have made this year, this is one of my favorites.
The last cake I am going to show you was for another neighbor who turned 12. She wanted an "Alice in Wonderland" cake and was very specific about her ideas. She even came prepared with pictures and colors for me when it came time to discuss the specifics. It was my most ambitious cake to date and I am not looking forward to doing that much detail work again anytime soon.
Next up, I get to make a first communion cake and a Nike sneaker grooms cake! And I made some absolutely delicious dark chocolate banana muffins that I will hopefully get to post about soon. I hope everyone is having a great big busy Spring!
Saturday, December 6, 2014
Flower Cakes and Retro Cupcakes
We can talk, right? Good. Because my kids are driving me crazy.
I made it through college with honors. I made it through basic training, more school, and being miles and miles away from the ones I love. I worked full time and went back to school for the fun of it. I'm not trying to brag here. I came out with a few bumps and bruises along the way. But I made it.
However, my down fall is going to be these two little brown-haired high energy whirlwinds on legs. Most days are good and I sooo have the mom thing down. But other days, I long for my Tempur-Pedic bed and there is not enough chocolate in the world to drown out the shrieks and shrills coming from the living room. And do I even need to mention that my baby is walking now?
And even with all that going on, I somehow managed to get a sweet 16 cake and some really cool retro arcade cupcakes done this week.
I worked with the Americolor edible ink pens this week and I have to say I loved it. Finally. I have tried the black ones before and failed miserably. I think it was because I was trying to copy someone else's work. I needed to find my own way with them.

I did find some inspiration on Pinterest for the sweet 16 cake. But I didn't go searching to see how they pulled it off. I just went for it. And I love the results. And so did the birthday girl.


I was also able to make some really cool cupcakes for a really cool kid I know. I have a neighbor who is completely into retro arcade games right now. As a matter of fact, he is spending his birthday weekend playing in an arcade that is stocked with old school upright boxes. Of course, he is turning twelve and when you ask him what "old school" means he thinks about Pokemon and Kirby. I took it a little further back for him and his parents though.

I made it through college with honors. I made it through basic training, more school, and being miles and miles away from the ones I love. I worked full time and went back to school for the fun of it. I'm not trying to brag here. I came out with a few bumps and bruises along the way. But I made it.
However, my down fall is going to be these two little brown-haired high energy whirlwinds on legs. Most days are good and I sooo have the mom thing down. But other days, I long for my Tempur-Pedic bed and there is not enough chocolate in the world to drown out the shrieks and shrills coming from the living room. And do I even need to mention that my baby is walking now?
And even with all that going on, I somehow managed to get a sweet 16 cake and some really cool retro arcade cupcakes done this week.
I worked with the Americolor edible ink pens this week and I have to say I loved it. Finally. I have tried the black ones before and failed miserably. I think it was because I was trying to copy someone else's work. I needed to find my own way with them.
I did find some inspiration on Pinterest for the sweet 16 cake. But I didn't go searching to see how they pulled it off. I just went for it. And I love the results. And so did the birthday girl.
I hand drew the flowers with the black pen and then would work in small sections with the color. A paintbrush dipped in a little water to spread the ink and I was on my way. Just a little bit of water will do since you are working with fondant. I love the effect it created.
I included his Pokemon and Kirby characters but who can argue with a little Mario and Galaga?
Wednesday, August 27, 2014
Busy Summer
I know I promised at the beginning of the year that I was going to post more. What I didn't realize was how busy and how tired I was going to be this summer. We have been working on the house, hosting cul de sac BBQs, planning a HOA community picnic, meeting new neighbors, watching our babies grow, and so on and so on.
I have also found a fan of my baking in one of my husband's coworkers. So I have been busy baking for him and his family recently. One of the new things I tried was a Nutella buttercream frosting on top of a chocolate cupcake.

I got the inspiration from the Cannella Vita website. As you can see, my cupcakes look a little different, but goodness they were delicious. I used a chocolate cupcake recipe that I have been using for a while and then followed Erica's instructions on making the buttercream. I just swirled mine instead of piping two different frostings.
I also had the chance to make my son a birthday cake this past week. My little man turned three this past weekend and is blowing me away with what he knows. His favorite television show right now is Paw Patrol. And his favorite dog on the show is Rubble. He helped pick out the colors and everything!

I make baked goods so often that our son informed his doctor at today's visit that our last name is "Cake". Hey, it could be worse.
I have also found a fan of my baking in one of my husband's coworkers. So I have been busy baking for him and his family recently. One of the new things I tried was a Nutella buttercream frosting on top of a chocolate cupcake.
I got the inspiration from the Cannella Vita website. As you can see, my cupcakes look a little different, but goodness they were delicious. I used a chocolate cupcake recipe that I have been using for a while and then followed Erica's instructions on making the buttercream. I just swirled mine instead of piping two different frostings.
I also had the chance to make my son a birthday cake this past week. My little man turned three this past weekend and is blowing me away with what he knows. His favorite television show right now is Paw Patrol. And his favorite dog on the show is Rubble. He helped pick out the colors and everything!
I make baked goods so often that our son informed his doctor at today's visit that our last name is "Cake". Hey, it could be worse.
Monday, June 23, 2014
Cakes, cakes, and more cakes
I get asked a lot if I am a professional baker. And the answer is "no". I then get asked if I want to do this for a living. And the answer is " I don't know". Why do I feel weird telling people that I am still trying to figure out what I want to be when I grow up? I am going to be 33 soon and I still haven't figured out yet what I want to do with my life.
But for right now, with my two beautiful babies still at home, I am enjoying what I do. I really don't make any money off of my baking. I sold two dozen cupcakes the other day but I have also spent a small fortune at the grocery store this week buying other supplies. My husband recently asked me what I want for my birthday at the end of the summer and I sent him my Amazon wish list full of fondant cutters and other goodies. It never ends.
This week I got to make three different cakes for three different occasions. I was completely swamped with other things too. I am worn out and my back hurts tremendously...but I kinda can't wait to do it again.
The first cake I made was for my father-in-law. He LOVES golf. Every single Sunday and Wednesday he is on the course. And what's with the "Faja" you say? Apparently, he is also a huge Austin Powers fan. He even has my son calling him Grandfaja.

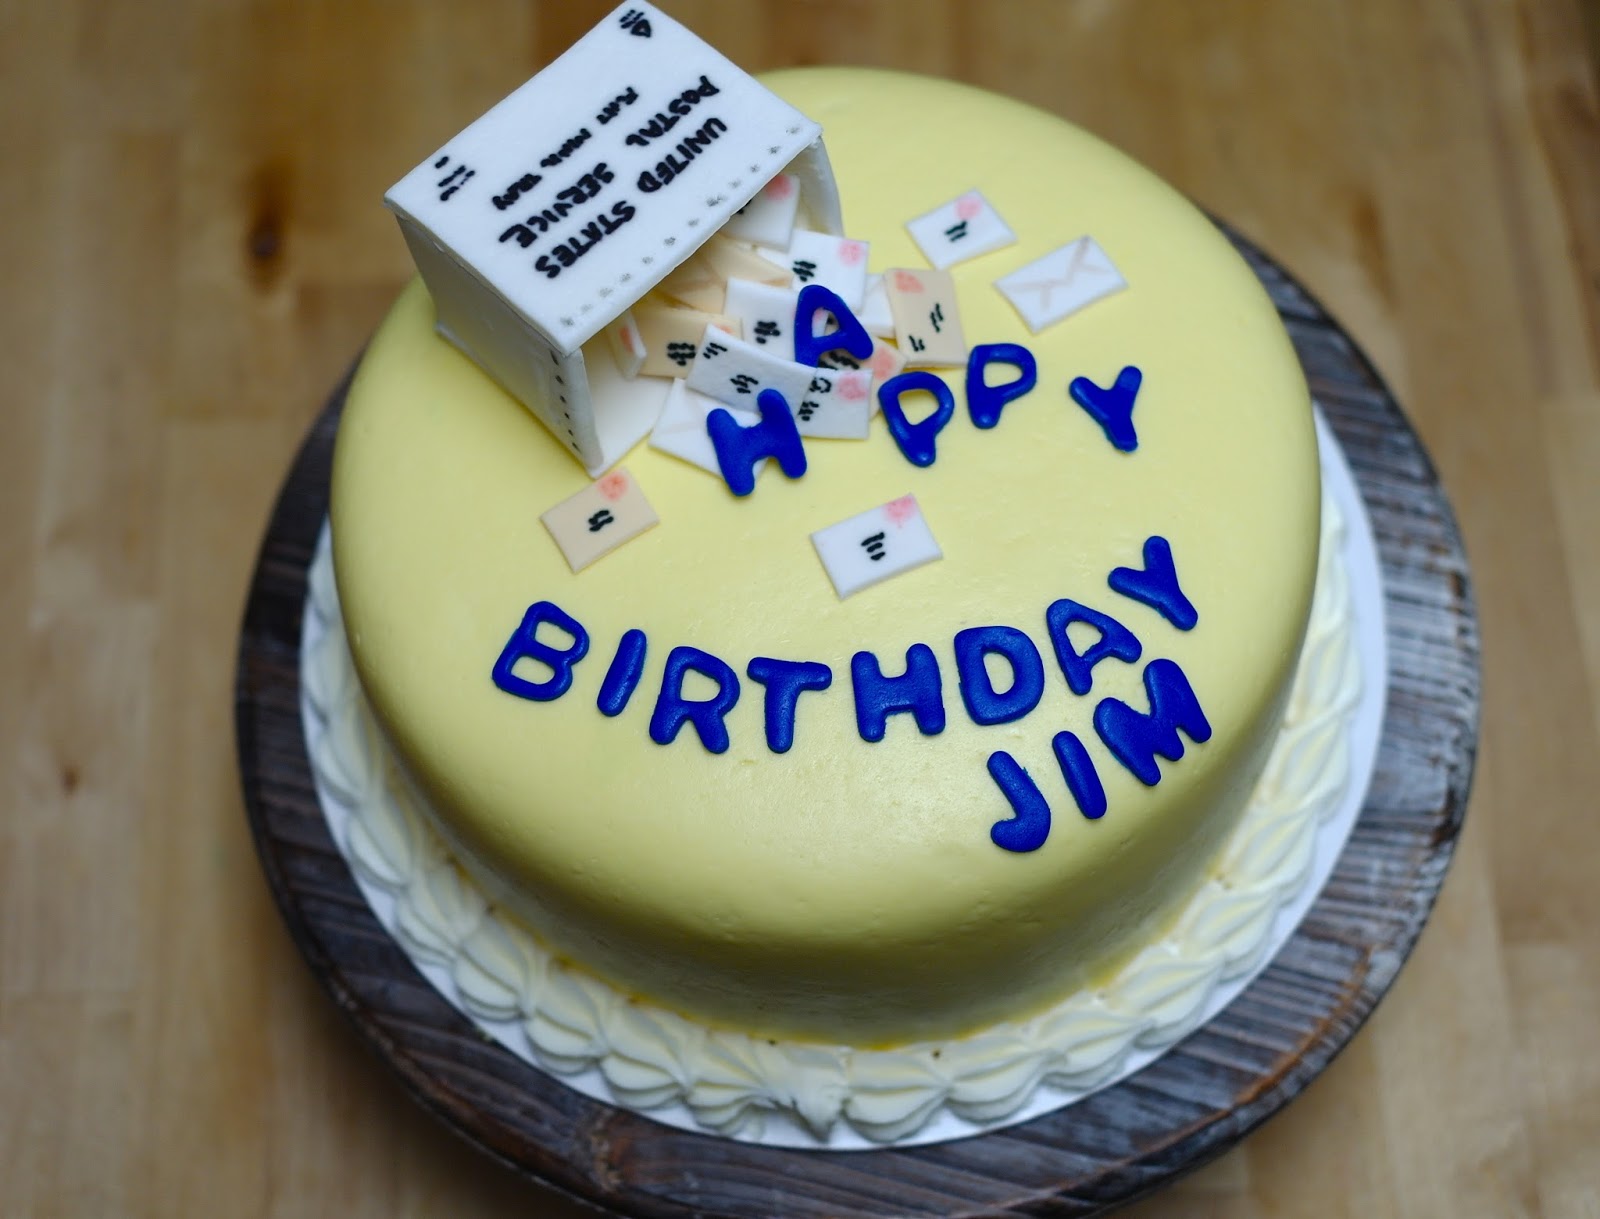
The second cake I made was for my New York born and bred neighbor. He just retired from the Post Office and makes me laugh every single time I see him. As soon as I told him it was his favorite chocolate cake I make, he gave me a huge hug too.
The third cake I made this week was for another very special neighbor of ours. I got to meet the mom and son while I was out walking with my children. Her little boy was 15 months at the time and she explained that over the last few months he had been battling brain cancer. I told her a little later on that I wasn't sure whether I wanted to cry or give her and her boy a hug.
You see, I left the conversation feeling so many things. I was having, what I thought, was a pretty crappy day. My daughter was not feeding well and my son was not listening to a word I said. I went for a walk to get some fresh air and to wear out my energetic boy. I quickly realized after talking to JR's mom that I could be dealing with so much more. For all the heart break and stress she was going through, she had a huge smile on her face the whole time talking about how great he, her Superman baby, had been doing with his treatments.
So I just knew I had to make a cake for him to celebrate his treatments ending soon. I got to deliver my promise on his cake this weekend.

And seeing the joy on their faces when I showed up was payment enough for me.
But for right now, with my two beautiful babies still at home, I am enjoying what I do. I really don't make any money off of my baking. I sold two dozen cupcakes the other day but I have also spent a small fortune at the grocery store this week buying other supplies. My husband recently asked me what I want for my birthday at the end of the summer and I sent him my Amazon wish list full of fondant cutters and other goodies. It never ends.
This week I got to make three different cakes for three different occasions. I was completely swamped with other things too. I am worn out and my back hurts tremendously...but I kinda can't wait to do it again.
The first cake I made was for my father-in-law. He LOVES golf. Every single Sunday and Wednesday he is on the course. And what's with the "Faja" you say? Apparently, he is also a huge Austin Powers fan. He even has my son calling him Grandfaja.
The second cake I made was for my New York born and bred neighbor. He just retired from the Post Office and makes me laugh every single time I see him. As soon as I told him it was his favorite chocolate cake I make, he gave me a huge hug too.
The third cake I made this week was for another very special neighbor of ours. I got to meet the mom and son while I was out walking with my children. Her little boy was 15 months at the time and she explained that over the last few months he had been battling brain cancer. I told her a little later on that I wasn't sure whether I wanted to cry or give her and her boy a hug.
You see, I left the conversation feeling so many things. I was having, what I thought, was a pretty crappy day. My daughter was not feeding well and my son was not listening to a word I said. I went for a walk to get some fresh air and to wear out my energetic boy. I quickly realized after talking to JR's mom that I could be dealing with so much more. For all the heart break and stress she was going through, she had a huge smile on her face the whole time talking about how great he, her Superman baby, had been doing with his treatments.
So I just knew I had to make a cake for him to celebrate his treatments ending soon. I got to deliver my promise on his cake this weekend.
And seeing the joy on their faces when I showed up was payment enough for me.
Wednesday, June 4, 2014
Chocolate Peanut Butter Cookies

We have been trying to behave this week on food. We even have lettuce in the fridge. We are actually using the crisper drawer in the fridge for what it was meant for. And here I thought it was just extra storage for unsalted butter sticks.
But after dealing with our third round of colds this year, and a three hour trip to the dentist today, we needed a little chocolate. Luckily, my husband has coworkers who will eat anything we bring them so most of the cookies are headed their way.
I have to be honest. I am not sold on these cookies yet. It is probably because the original recipe calls for chunky peanut butter. Don't get me wrong. We LOVE chunky peanut butter. But we have been die hard fans of NATURAL peanut butter for years. And without the added sugar and other additives, the natural stuff will alter the outcome of the cookies. They still taste pretty darn good. But I am very curious to see what a difference a good ole scoop of Jif would make to these cookies.

What you will need
1 stick of unsalted butter, softened
1/2 cup of chunky peanut butter
1 cup of dark brown sugar, packed
1 large egg
1 teaspoon of vanilla extract
1 cup of all purpose flour
1/4 cup of unsweetened cocoa powder
1/2 teaspoon of baking soda
1/2 cup of semisweet chocolate chips
Two words for this recipe. Super easy. Cream the butter, brown sugar, and peanut butter together in a mixing bowl. Once everything is light and fluffy, add in the egg and vanilla. Now throw in your dry ingredients and mix together. Once done, fold in your chocolate chips. How easy is that? I wasn't lying when I said "super".

Portion the dough onto a cookie sheet lined with parchment paper and bake for about 10 minutes at 350 degrees.
I will try to do an update soon with regular peanut butter to show a difference. Keep you posted!
Print Recipe - Chocolate Peanut Butter Cookie
************STATUS UPDATE************
So I had an epiphany the other night in the shower. Some people figure out how to end world hunger while shampooing their hair, others might realize just how to beat that level in the video game they are playing while soaping up...I think about cookies during my 10 minutes away from my screaming 3 year old.
Not only was changing the peanut butter the key to these cookies but actually using the right type of leavening agent helped too. I know. I know. I obviously was having a moment. For some reason, I knew I needed baking soda but my hand grabbed the baking powder. Hence the reason the cookie dough had a mousse like texture the first time around.
But using baking soda and crunchy Jif, the second batch turned out so much better. They were a little sweeter and a little softer too!

Tuesday, May 6, 2014
The Best Chocolate Buttercream Frosting
Ever.
I usually don't believe the hype when recipes are labeled "the best" or "the ultimate". So when I came across this post labeled "Perfect Chocolate Buttercream Frosting", I was a little skeptical. Boy...was I ever wrong.

This frosting is A-M-A-Z-I-N-G.
It doesn't take many ingredients. And once you try it, you will be hooked. Forever.
What you will need
3 sticks of unsalted butter, softened
1 cup of unsweetened cocoa
5 cups of confectioner sugar
1/2 cup of milk
2 teaspoons of vanilla extract
1 teaspoon of espresso powder
If you checked out the post I mentioned (and you should), you will notice that I doubled the amount of espresso powder. My husband loves coffee flavored anything so hence the change.
Beat the cocoa and butter together until well combined. It will be a very dark sticky chocolate. Add in one cup of sugar and one tablespoon of milk on low speed. Once the two are combined, turn the mixer on medium speed for about a minute. Lower the speed and add more sugar and milk and keep the cycle going until all the sugar is gone. You may not use all the milk. You will have to watch the consistency of the frosting.
Add in the vanilla and espresso powder at the end and combine until well mixed.
I have made this frosting the day before an event and just kept it in the fridge. You can set it out until it gets to room temp or heat in the microwave on very small amounts until you can run a spoon through it.
It is absolutely amazing on the chocolate cake mentioned on the website too.
Now to thumb through the thesaurus for another word for "amazing"...
Print Recipe - Chocolate Buttercream Frosting
I usually don't believe the hype when recipes are labeled "the best" or "the ultimate". So when I came across this post labeled "Perfect Chocolate Buttercream Frosting", I was a little skeptical. Boy...was I ever wrong.
This frosting is A-M-A-Z-I-N-G.
It doesn't take many ingredients. And once you try it, you will be hooked. Forever.
What you will need
3 sticks of unsalted butter, softened
1 cup of unsweetened cocoa
5 cups of confectioner sugar
1/2 cup of milk
2 teaspoons of vanilla extract
1 teaspoon of espresso powder
If you checked out the post I mentioned (and you should), you will notice that I doubled the amount of espresso powder. My husband loves coffee flavored anything so hence the change.
Beat the cocoa and butter together until well combined. It will be a very dark sticky chocolate. Add in one cup of sugar and one tablespoon of milk on low speed. Once the two are combined, turn the mixer on medium speed for about a minute. Lower the speed and add more sugar and milk and keep the cycle going until all the sugar is gone. You may not use all the milk. You will have to watch the consistency of the frosting.
Add in the vanilla and espresso powder at the end and combine until well mixed.
I have made this frosting the day before an event and just kept it in the fridge. You can set it out until it gets to room temp or heat in the microwave on very small amounts until you can run a spoon through it.
It is absolutely amazing on the chocolate cake mentioned on the website too.
Now to thumb through the thesaurus for another word for "amazing"...
Print Recipe - Chocolate Buttercream Frosting
Tuesday, April 15, 2014
Nutella Filled Cookies
We are going to revisit one of my favorite things...Nutella. I have made Nutella cupcakes before and they were delicious. But these Nutella filled cookies have them beat.

I found the recipe on Red Tricycle which is a site to help you discover cool stuff to do in your area. The website also has crafts and food!
Now this recipe does require a little organization so please read through all the way before you start baking. You will be working with browned butter which is something I have always heard of but never have tried till now. Apparently, I have been missing out on something.

What you will need for the recipe
2 1/4 cup of all purpose flour
1 1/4 teaspoon of baking soda
1/4 teaspoon of salt
2 sticks of unsalted butter
1 1/4 cup of dark brown sugar
1/4 cup of granulated sugar
1 large egg plus one egg yolk
1 1/2 teaspoons of vanilla
1 tablespoon of plain greek yogurt
3/4 cup of semi-sweet chocolate chips
1/2 cup of milk chocolate chips
1/2 cup of dark chocolate chips
1 jar of Nutella (chilled in the fridge)
Combine the flour, baking soda, and salt in a bowl and set aside. Gather all the other ingredients before you start dealing with your butter because it will need all of your attention.

You know the easiest way to get just an egg yolk, right? Of course, you can crack and egg and go back and forth between the shell halves draining the egg white. Or, if you don't mind slimy things, just crack the egg into your hand. The egg white drains off in between your fingers and you are left with just the yolk!
Now for the butter. Put the butter in a saucepan and turn on medium heat. The butter will melt and start to foam. Start to whisk the butter and don't stop. You don't want to run the risk of burning the butter. The butter will start to brown and give off a nutty aroma. Immediately pour the butter into a bowl to stop the cooking process. For a great example of browned butter, take a look at Simply Recipes. Let the butter cool for a few minutes before you start mixing any ingredients.
Combine the sugars and butter in a mixer and cream together. Once combined, add in your eggs, vanilla, and yogurt. The mixture will be a little soupy.

Now add in your flour mixture. Once the dry ingredients are combined, fold in your chocolate chips.

Now because of the dark brown sugar and browned butter, your cookie dough will be darker than what you usually see for a chocolate chip cookie. It's all good though! Throw the dough in the fridge for at least two hours.
Once the dough is chilled (and your Nutella is firmly set), set your oven to 350 degrees. Take a big chunk of the cookie dough, roll into a ball, and flatten it out. It's a little hard to do with the chocolate chips but you get the hang of it pretty quick. Take a teaspoon of Nutella and place in the middle.

Fold the dough around the Nutella. Flatten the cookie once again and throw the pan in the oven. The cookies only take about 10-12 minutes to bake. Once the cookies start to darken around the edges, pull them out of the oven. Let them sit on the pan for a few minutes because they will be extra gooey in the middle. If you would like, and I highly recommend, sprinkle a little bit of course sea salt on top.
Transfer them to a cooling rack to firmly set up and store in an airtight container. I hope you enjoy!
Nutella Filled Cookies - Print Recipe
I found the recipe on Red Tricycle which is a site to help you discover cool stuff to do in your area. The website also has crafts and food!
Now this recipe does require a little organization so please read through all the way before you start baking. You will be working with browned butter which is something I have always heard of but never have tried till now. Apparently, I have been missing out on something.
What you will need for the recipe
2 1/4 cup of all purpose flour
1 1/4 teaspoon of baking soda
1/4 teaspoon of salt
2 sticks of unsalted butter
1 1/4 cup of dark brown sugar
1/4 cup of granulated sugar
1 large egg plus one egg yolk
1 1/2 teaspoons of vanilla
1 tablespoon of plain greek yogurt
3/4 cup of semi-sweet chocolate chips
1/2 cup of milk chocolate chips
1/2 cup of dark chocolate chips
1 jar of Nutella (chilled in the fridge)
Combine the flour, baking soda, and salt in a bowl and set aside. Gather all the other ingredients before you start dealing with your butter because it will need all of your attention.
You know the easiest way to get just an egg yolk, right? Of course, you can crack and egg and go back and forth between the shell halves draining the egg white. Or, if you don't mind slimy things, just crack the egg into your hand. The egg white drains off in between your fingers and you are left with just the yolk!
Now for the butter. Put the butter in a saucepan and turn on medium heat. The butter will melt and start to foam. Start to whisk the butter and don't stop. You don't want to run the risk of burning the butter. The butter will start to brown and give off a nutty aroma. Immediately pour the butter into a bowl to stop the cooking process. For a great example of browned butter, take a look at Simply Recipes. Let the butter cool for a few minutes before you start mixing any ingredients.
Combine the sugars and butter in a mixer and cream together. Once combined, add in your eggs, vanilla, and yogurt. The mixture will be a little soupy.
Now because of the dark brown sugar and browned butter, your cookie dough will be darker than what you usually see for a chocolate chip cookie. It's all good though! Throw the dough in the fridge for at least two hours.
Once the dough is chilled (and your Nutella is firmly set), set your oven to 350 degrees. Take a big chunk of the cookie dough, roll into a ball, and flatten it out. It's a little hard to do with the chocolate chips but you get the hang of it pretty quick. Take a teaspoon of Nutella and place in the middle.
Fold the dough around the Nutella. Flatten the cookie once again and throw the pan in the oven. The cookies only take about 10-12 minutes to bake. Once the cookies start to darken around the edges, pull them out of the oven. Let them sit on the pan for a few minutes because they will be extra gooey in the middle. If you would like, and I highly recommend, sprinkle a little bit of course sea salt on top.
Transfer them to a cooling rack to firmly set up and store in an airtight container. I hope you enjoy!
Nutella Filled Cookies - Print Recipe
Monday, March 17, 2014
Chocolate Bourbon Pecan Pie
I decided to use my husband's Christmas gift in my baking yesterday.

Yes, my husband got alcohol for Christmas. My extended family from Boston decided to have a Yankee swap this past December. Now for all you good ole Southerners out there like me, you are probably asking yourself what a "Yankee Swap" is. It is like a Secret Santa, but you can steal someone else's gift if you don't like the one you picked out. The theme of the swap was to buy something that would help you stay warm. Girls bought for girls and boys bought for boys. I got a super cute pair of red flannel pajama bottoms with reindeer on them. My husband got liquor. Enough said.
So I grabbed the alcohol, some pecans, and some chocolate chips and threw them into a frozen deep dish pie crust. And it was delicious.
Here is the recipe
3 eggs
1/2 cup of light corn syrup
1/2 stick of melted butter
3/4 cup of light brown sugar, packed
2 tablespoons of bourbon
2 tablespoons of all purpose flour
1 tablespoon of vanilla
1 1 /2 cups of chopped pecans
1 cup of semisweet of chocolate chips
1 deep dish pie crust
This is so simple. Take everything from the eggs to the vanilla and combine in a bowl.

Throw in your chopped pecans and chocolate chips and stir together.

Pour the mixture into your pie crust. Like I said, I used a frozen pie crust. Don't judge. If you are feeling ambitious, and you don't have a toddler screaming his lungs off, then totally make your own crust!!


Yes, my husband got alcohol for Christmas. My extended family from Boston decided to have a Yankee swap this past December. Now for all you good ole Southerners out there like me, you are probably asking yourself what a "Yankee Swap" is. It is like a Secret Santa, but you can steal someone else's gift if you don't like the one you picked out. The theme of the swap was to buy something that would help you stay warm. Girls bought for girls and boys bought for boys. I got a super cute pair of red flannel pajama bottoms with reindeer on them. My husband got liquor. Enough said.
So I grabbed the alcohol, some pecans, and some chocolate chips and threw them into a frozen deep dish pie crust. And it was delicious.
Here is the recipe
3 eggs
1/2 cup of light corn syrup
1/2 stick of melted butter
3/4 cup of light brown sugar, packed
2 tablespoons of bourbon
2 tablespoons of all purpose flour
1 tablespoon of vanilla
1 1 /2 cups of chopped pecans
1 cup of semisweet of chocolate chips
1 deep dish pie crust
This is so simple. Take everything from the eggs to the vanilla and combine in a bowl.
Throw in your chopped pecans and chocolate chips and stir together.
Pour the mixture into your pie crust. Like I said, I used a frozen pie crust. Don't judge. If you are feeling ambitious, and you don't have a toddler screaming his lungs off, then totally make your own crust!!
Bake the pie for 15 minutes at 425 degrees and then lower the temperature of the oven to 350 degrees. Bake for an additional 40-45 minutes. Pull out of the oven and cool completely. I threw the pie in the fridge because we like to eat it cold with a little bit of whipped cream.
Your house will smell amazing all day after baking this pie. You can thank me later.
Sunday, February 16, 2014
Sugar Cookie Recipe
Lil' bit and I worked on some sugar cookies the other day with this recipe from Katrina's Kitchen. Please go to her site and check out the recipe. I liked the fact that you didn't have to chill the dough like with most sugar cookies. Just mix it up and go. It will be very crumbly like she mentions so be forewarned. Roll it out and cut your shapes.

My son loved the sprinkles part!

And whatever you do, do NOT over-bake these suckers. If your cookies are starting to turn brown on the edges, it is too late!!
With that being said, these were very tasty. My husband liked the addition of the almond extract. They hardly lasted 24 hours in our house. So give them a try and let your little ones do the decorating. They may not be the prettiest cookies you ever made but who cares.
Enjoy!
My son loved the sprinkles part!
And whatever you do, do NOT over-bake these suckers. If your cookies are starting to turn brown on the edges, it is too late!!
With that being said, these were very tasty. My husband liked the addition of the almond extract. They hardly lasted 24 hours in our house. So give them a try and let your little ones do the decorating. They may not be the prettiest cookies you ever made but who cares.
Enjoy!
Tuesday, February 4, 2014
It's been a long time
Where do I even begin?
Hi! Let me re-introduce myself. I am the Baking Pixie and I have been gone for way too long. It has been over a year since I have been able to post and share anything sweet. To say I was busy would be a little bit of an understatement.
You see...
We bought our first house this year. We started searching last January and signed all the papers in March. Then we got to painting and ripping out carpets and installing hardwood floors and removing plants in the front yard and...


"Morning" sickness needs to be renamed to "All Day" Sickness. I'm just sayin'. And just like with my son, I was unable to eat anything sweet for the first few months with my daughter. We had some serious conversations late at night about her hatred towards chocolate chip cookies and ice cream. I tried to tell her they were harmless and delicious. She just wouldn't listen to me.
So while trying to deal with the queasiness and the growing belly, I was running and waddling after my little rugrat who is growing up way too fast.

And then we hit a month that was very hard for our family. I was told that our baby was at high risk for having Down Syndrome. I started doing some research and I knew no matter the results of all the tests that our child would be loved by everyone. But it was hard. I am not going to lie. We had extra tests done and a very detailed ultrasound to see if the baby showed any signs of having that one extra chromosome. And then we had to wait for the results. I cried during the wait. My husband cried. And our daughter turned out perfect.

This last year wasn't just all babies and fixing up the house though. I did make my very first wedding cake in October for an awesome couple we know. I even made a grooms cake. And then had to explain to everyone in the family what a grooms cake was. I guess that is one of the big disadvantages of growing up in the north. That and the lack of sweet tea. I would never make it.

I even got my blog mentioned in Fox News Magazine for National Peanut Butter Day, which was on the 24th of January. You can check out the article here.
It has been a year full of ups and downs and crying for the good and the bad. I so can't wait to see what this year has in store for us as we watch our children grow and we continue to work on our house. I also can't wait to start baking again and sharing the recipes with you!
Thank you for waiting for me,
The Baking Pixie
Hi! Let me re-introduce myself. I am the Baking Pixie and I have been gone for way too long. It has been over a year since I have been able to post and share anything sweet. To say I was busy would be a little bit of an understatement.
You see...
We bought our first house this year. We started searching last January and signed all the papers in March. Then we got to painting and ripping out carpets and installing hardwood floors and removing plants in the front yard and...
And then after competing in an alumni swim meet back in my hometown, I found out I was pregnant with our second child.
So while trying to deal with the queasiness and the growing belly, I was running and waddling after my little rugrat who is growing up way too fast.
And then we hit a month that was very hard for our family. I was told that our baby was at high risk for having Down Syndrome. I started doing some research and I knew no matter the results of all the tests that our child would be loved by everyone. But it was hard. I am not going to lie. We had extra tests done and a very detailed ultrasound to see if the baby showed any signs of having that one extra chromosome. And then we had to wait for the results. I cried during the wait. My husband cried. And our daughter turned out perfect.
I even got my blog mentioned in Fox News Magazine for National Peanut Butter Day, which was on the 24th of January. You can check out the article here.
It has been a year full of ups and downs and crying for the good and the bad. I so can't wait to see what this year has in store for us as we watch our children grow and we continue to work on our house. I also can't wait to start baking again and sharing the recipes with you!
Thank you for waiting for me,
The Baking Pixie
Monday, January 7, 2013
Mocha Cinnamon Chocolate Chip Cookies
I tried a new recipe out of a book that shall rename nameless. You see I was always under the impression that 3 sticks of better was 1 1/2 cups... or 12 ounces. However you like to roll with the measuring there. This book says that 1 1/2 cups of butter is 10 ounces. Huh? Are they getting gypped out of butter over there? What's going on?
Anyway, I went with my gut and did 3 full sticks o butter for this recipe and the cookies came out okay. You see. I am not a coffee person. I hardly drink it unless it was with ice and caramel. I don't really eat coffee ice cream or chocolate covered beans or whatever else my husband devours with coffee. I get my caffeine in the chocolate form.
The cookies did remind me of my husbands favorite Starbucks Java Chip ice cream though.

And I have to apologize. I have no photos of the final product. I was super lazy and really cold this morning and did not want to get out of bed. Mr. Baking Pixie took the cookies to work and I am pretty sure he will come home with an empty container.
If you want to try the recipe, here is what you will need
2 cups of unbleached all purpose flour
1/2 teaspoon of baking powder
3/4 teaspoon of ground cinnamon
1/4 teaspoon table salt
10 (or cough cough...12) ounces of unsalted butter, softened
3 tablespoons of instant espresso powder (or 4 tablespoons of instant coffee granules)
1 cup of powdered sugar
1/2 cup of light brown sugar, packed
1 1/2 cups of semisweet chocolate chips
about 1/4 cup of granulated sugar for dipping
In a small bowl, mix together the flour, baking powder, cinnamon, and salt. Set that bowl aside for a moment. Now with a mixer, cream the softened butter and coffee until light and fluffy. Add in your sugars and make sure you scrape down the bowl.
Once everything is combined, add in your flour mixture in small batches until blended. Now dump in your chocolate chips and stir.
Put the granulated sugar in a shallow bowl or plate. Take about a teaspoon of the cookie dough and flatten it a little. Dip one side of the cookie in the sugar and place on a cookie sheet, sugar side up. Space the cookies out a bit because they will spread.
Bake the cookies at 350 degrees for about 14 minutes. The cookies need to get brown around the edges. Leave the cookies on the cookie sheet for a few minutes before you transfer them to a cooling rack. I actually put paper towels down on the rack and placed the cookies on top of the paper towels.
I hope you enjoy no matter how much butter you use!!
Saturday, December 8, 2012
Peppermint Patty Chocolate Chocolate Chip Sandwiches
I have been absent for a while lately. Shame on me, I know. But I have a Christmas tree up and all my gifts have been bought. I have all my baking supplies for brownie gift boxes for my husband's coworkers. I have supplies for homemade body scrubs. And homemade vanilla extract is already brewing in the top cabinet. If you have never heard of Beanilla, check out their site.
I had a great little hometown store back in Florida where they sold vanilla beans for super cheap. I haven't found a similar place here in North Carolina. Every bean I see here, I would have to choose which arm or leg I would need sacrifice to purchase it. For a little while, Beanilla had a special where you could buy 25 beans for 25 dollars. Awesome!
But the main reason for this post is to let you know about a site that I have been following for a while. I love Cookies and Cups. Shelly has a weakness for buttercream, chocolate, and candy. And most of her recipes don't require a ton of ingredients.
So take a moment and check out her delicious post where she makes chocolate cookies sandwiched together with a York peppermint patty here. I tweaked it a little and used my recipe for ooey gooey chocolate chip cookies. They are a little intense and you would be crazy not to have a glass of milk on hand when you eat one. I'm sorry I don't have pictures. They didn't last long enough for me to pull out the camera.
You have been warned. Now, go and enjoy.
Wednesday, October 17, 2012
Cinnamon Chex Mix
I found this recipe thanks to Pinterest (duh!). The original recipe is located here courtesy of Just Another Day in Paradise. Go visit her site. She has much prettier pictures of the final yummy cereal than I do.

I have to be honest with you on this one. I wasn't digging this so much yesterday when I made it. But give me 90 minutes of yoga and a glass of orange juice and this stuff is AMAZING.
The huge downfall to this recipe is you need cinnamon chips. Yes, I had to google it too because I had never heard of or seen cinnamon chips in my life. But thanks to a wonderful website called Nuts.com, you can have cinnamon chips delivered straight to your door.

My mom found that site a few years ago when she started getting my husband nonpareils for Christmas. It's his favorite candy. And his dad's favorite. And his grandmother's favorite...
For the recipe you will need
1 box of Rice Chex cereal
3 cups of cinnamon chips
1/2 to 3/4 cup of powdered sugar
1/4 cup of granulated sugar
1 1/2 teaspoons of ground cinnamon
Throw the box of cereal in a big bowl. I always use my tupperware cake carrier. You know the big plastic dome that snaps onto a bottom. That way you can shake everything without getting sugar every where.

Pour the cinnamon chips into a microwavable container and heat 30 seconds at a time. By the way, if you order the chips off Nuts.com, one pound equals roughly 3 cups.

Stir the chips until everything is melted and smooth. Now pour the melted cinnamon chips over the cereal and stir until combined. Now combine all the sugars together in a bowl. I started off with just 1/2 cup of the powdered sugar, but ended up sprinkling some extra on at the end.

Sprinkle the sugars over the chex cereal. Snap on the bottom of the cake container if you got it and shake. Or if you are less messy than I am, stir the cereal until the sugars start to coat the cereal. If you need to add more sugar, sprinkle on a little powdered sugar like I did, and stir (or shake) again.
And there you have it...a cinnamony crunchy delicious snack. Enjoy!
Cinnamon Chex Mix - Print Recipe
Friday, September 28, 2012
Chocolate Chip Oatmeal Cookies
Today I made chocolate chip oatmeal cookies. I have been craving these oatmeal raisin cookies all this week. But I didn't have that much butter, or orange juice concentrate, or enough raisins, or...

And I was feeling kinda lazy (since I woke up at 5:15 to go to yoga) to go to the store for all of it. So I came across a recipe in a new book I got and promptly rewarded myself with cookies for going to work out.
Balance, people. It's all about the balance.

This recipe does use shortening, which I am not a fan of when it comes to substituting for butter. But the cookies did turn out pretty well and didn't leave a weird feeling in your mouth.

What you will need for this recipe
3/4 cup of shortening
1 cup of brown sugar, packed
1/2 cup of granulated sugar
1 egg, beaten
1/4 cup of water
1 teaspoon of vanilla
1 cup of all purpose flour
1 teaspoon of salt
1/2 teaspoon of baking soda
3 cups of quick oats
1 12 ounce package of semi-sweet chocolate chips

Take the first 6 ingredients, from the shortening to the vanilla, and combine them in a mixing bowl. It will look a little lumpy because of the shortening.

Now combine the flour, salt, and baking soda in another bowl.

Note: I should probably use a bowl that hasn't been stained with marinade and tandoori.
Throw the flour mix into the shortening mix and combine.

Now dump the oats and chocolate chips in.

That looks wonderful. Now stir in the chips and oats by hand.
Drop mounds of cookie dough onto a cookie sheet lined with parchment paper. I did use a portion scoop, but ended up smashing the cookies down a bit. Bake at 350 degrees for about 10 minutes.
And you are done.
The fluff balance has been restored.
Chocolate Chip Oatmeal Cookies - Print Recipe
Subscribe to:
Posts (Atom)